

Getting Started with DIY Sublimation Printing: Equipment Selection and Basic Operation Tutorial
Sublimation printing is a fun and creative way to make custom designs on items like mugs, t-shirts, and phone cases. It’s a process where you print designs onto special paper, then use heat to transfer those designs onto your chosen materials. If you’re new to this, don’t worry—this guide will walk you through the basics of picking the right equipment and getting started with sublimation printing. By the end, you’ll have a clear idea of what you need and how to use it.
What Is Sublimation Printing?
Sublimation printing uses heat to turn solid dye into a gas that bonds with materials like polyester or polymer-coated items. The result is vibrant, long-lasting designs that don’t fade or peel. It’s perfect for DIY projects because it’s versatile and beginner-friendly once you get the hang of it. You’ll need specific tools to start, but the process is straightforward if you follow the steps.
Choosing the Right Equipment
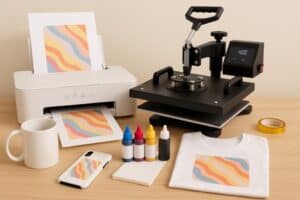
Before you start printing, you need to gather the right tools. Here’s a breakdown of the essentials.
Sublimation Printer
The first thing you need is a sublimation printer. These printers use special sublimation ink to print designs onto transfer paper. You can convert some inkjet printers, like certain Epson models, for sublimation by using sublimation ink. However, dedicated sublimation printers are often easier for beginners because they’re designed for this purpose.
For larger projects like banners or big apparel designs, consider a wide format sublimation printer. These printers can handle bigger paper sizes, giving you more flexibility. Check out options at wide format sublimation printer to find one that fits your needs. Prices range from $300 for basic models to over $1,000 for professional ones, so think about your budget and project size.
Sublimation Ink and Paper
You can’t use regular ink or paper for sublimation. Sublimation ink is specially formulated to turn into gas under heat, and sublimation paper is designed to hold the ink until it’s transferred. Buy ink and paper that match your printer brand for the best results. A starter pack of ink usually costs $50–$100, and a pack of 100 sheets of sublimation paper is around $15–$30.
Heat Press
A heat press is what transfers your design from the paper to your item. There are different types, like clamshell presses for flat items (t-shirts, mousepads) or mug presses for curved surfaces. Combo presses can handle multiple types of items, which is great if you want variety. Expect to spend $100–$500 depending on the type and size. Make sure your heat press has adjustable temperature and pressure settings for better control.
Substrates (Items to Print On)
Sublimation works best on polyester fabrics or items coated with a polymer layer, like ceramic mugs, metal tumblers, or phone cases. Avoid cotton or non-coated materials, as they won’t hold the design well. You can find blank sublimation items online or at craft stores, with prices like $2–$5 for mugs or $10–$20 for shirts.
Other Supplies
You’ll also need heat-resistant tape to secure the paper to your item, a computer for designing, and design software like Adobe Photoshop or free options like Canva. A cutting mat and scissors are handy for trimming paper. Budget about $20–$50 for these extras.
Setting Up Your Workspace
Sublimation printing needs a clean, organized workspace. You’ll be working with heat and ink, so safety and tidiness matter.
- Choose a Well-Ventilated Area: The heat press can get hot, and ink fumes might be strong. Set up in a room with good airflow, like near a window.
- Clear Space for Equipment: Your printer and heat press need flat, stable surfaces. Keep them away from edges to avoid accidents.
- Organize Supplies: Store your ink, paper, and blanks in a dry, dust-free spot. Dust can ruin prints, so keep things covered.
- Safety First: Have heat-resistant gloves and a fire extinguisher nearby. Make sure your heat press is on a heat-safe surface.
Basic Operation Steps
Once your equipment is ready, it’s time to start printing. Here’s a step-by-step guide to your first sublimation project.
Step 1: Create Your Design
Use your design software to create or upload your artwork. Keep these tips in mind:
- Make sure the design fits the size of your item (e.g., a mug design might be 8×3 inches).
- Use high-resolution images (at least 300 DPI) for sharp results.
- Mirror the design before printing, as it will reverse during transfer.
Save your design as a PNG or JPEG file.
Step 2: Print the Design
Load sublimation paper into your printer. In your printer settings, select the highest quality print option and choose “mirror” or “flip horizontally” if you didn’t mirror the design earlier. Print one test page to check colors and alignment. Sublimation inks look dull on paper but will pop after transfer.
Step 3: Prepare the Item
Clean your item (mug, shirt, etc.) with a lint-free cloth to remove dust or oils. If you’re printing on fabric, pre-press it with the heat press for 5–10 seconds to remove wrinkles and moisture. This helps the design stick better.
Step 4: Secure the Design
Place the printed sublimation paper on your item, with the design facing down. Use heat-resistant tape to hold it in place so it doesn’t shift. For mugs, wrap the paper tightly around the surface. For flat items like shirts, lay the paper flat and smooth out any wrinkles.
Step 5: Heat Press the Design
Set your heat press to the right temperature and time for your material. Common settings are:
- Polyester shirts: 400°F for 40–60 seconds.
- Mugs: 380–400°F for 180–240 seconds.
Place your item in the heat press, close it, and apply medium pressure. Start the timer. When it’s done, carefully remove the item (use gloves—it’s hot!) and peel off the paper while it’s still warm for the best results.
Step 6: Cool and Check
Let your item cool for a few minutes. Check the design for vibrancy and clarity. If it looks faded or uneven, you might need to adjust the temperature, time, or pressure and try again.
Tips for Success
- Test First: Always do a test print on a cheap item to avoid wasting expensive blanks.
- Follow Manufacturer Guides: Your printer, ink, and heat press might have specific instructions. Check them to avoid mistakes.
- Keep Records: Note down the time, temperature, and pressure settings that work for each item. This saves time for future projects.
- Practice Patience: Sublimation takes trial and error. Don’t get frustrated if your first few tries aren’t perfect.
Troubleshooting Common Issues
- Faded Colors: Increase the heat press time or temperature slightly.
- Blurry Design: Check that the paper is taped tightly and not shifting. Also, ensure your image is high-resolution.
- Uneven Transfer: Make sure pressure is even across the item. For mugs, use a wrap or clamp to keep the paper snug.
Where to Buy Supplies
You can find sublimation supplies at places like Amazon, Heat Press Nation, or Coastal Business Supplies. For specific equipment like a wide format sublimation printer, check trusted retailers or the link mentioned earlier. Compare prices and read reviews to get the best deals.
Final Thoughts
Sublimation printing is an exciting way to create custom items at home. With the right equipment—a printer, ink, paper, heat press, and blanks—you’re ready to start. Set up a clean workspace, follow the steps carefully, and don’t be afraid to experiment. It might take a few tries to get perfect results, but once you do, you’ll be hooked. Whether you’re making gifts or starting a small business, sublimation printing opens up endless possibilities. Get your tools, start small, and have fun creating!